VoiceCraft is a text to speech (TTS) and speech editing project written by Puyuan Peng which provides some interesting results for voice cloning with just a few seconds of input data. If you’re looking to try this tool out yourself but have hit some hurdles, I’ve created this guide which walks you through its use on Windows using Docker. You should have a little familiarity with Python to be able to use this tool.
What do you need?
During installation a significant amount of system memory is required otherwise you may experience swapping and a long setup time.
For the fullest experience using this software, it has some serious hardware requirements that you should make sure you can meet. It is VRAM hungry – this is from your GPU – but you may be able to make it work if you have a significant amount of RAM, as by default up to 50% of it will be provided as shared GPU memory.
You’ll need a total of 32GB available GPU memory. This can either be dedicated VRAM (e.g., an NVIDIA Tesla V100 workstation GPU), or a combination of VRAM and 50% system RAM (e.g., 16GB GPU, and 32GB of total system RAM).
However, if you do not have this much memory available, VoiceCraft’s kvcache setting can make it possible to run simpler activities, including voice cloning, with 8GB total GPU memory. In my own testing, kvcache did not affect the speed of voice cloning.
Final caveat, some features may also work fine purely on your CPU, but I gave up testing it after 7 minutes of it pegging 8 cores at 100% on an AMD Ryzen 7. For comparison, my GPU completes the demo workbook in 35 seconds.
Last of all you’ll need at least 16GB of free disk space.
Setup
You’re going to need to,
- Install Docker Desktop
- Enable Docker Desktop WSL2
- Build and run VoiceCraft container
Docker Desktop
Follow the official installation docs here: https://docs.docker.com/desktop/install/windows-install/
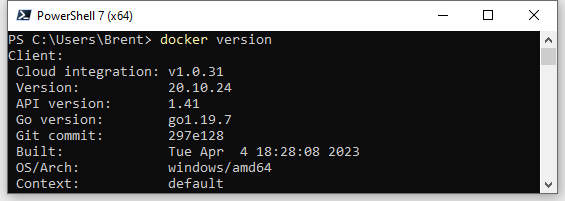
Ensure Docker is installed properly by running docker version in PowerShell.
docker version output in PowerShellEnable Docker Desktop WSL2
Follow the official setup docs here: https://docs.docker.com/desktop/wsl/#turn-on-docker-desktop-wsl-2
Once complete, ensure your GPU works with Docker: https://docs.docker.com/desktop/gpu/
Build and run VoiceCraft container
To build the VoiceCraft container download and extract a zip of the master branch, either visit the repository on github.com and download from the Download ZIP link in the green Code button, or click here: https://github.com/jasonppy/VoiceCraft/archive/refs/heads/master.zip
Follow the QuickStart Docker section or these abridged instructions:
cd VoiceCraft
docker build --tag "voicecraft" .
start-jupyter.bat
After some time the JupyterLab web interface will be available at http://localhost:8888 and you can get started.
Usage
We’ll take a look at using VoiceCraft for speech cloning by using the existing TTS inference notebook provided in the repo. Once you’ve successfully accessed the web interface, open the work directory from the left hand file browser and open inference_tts.ipynb by double clicking it. In the new tab that opens you should see the title “VoiceCraft Inference Text To Speech Demo.” This workbook is a python script broken into “cells” that need to be run in sequential order.
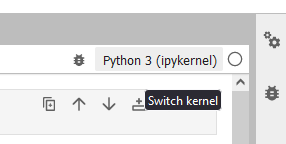
The first thing that may trip you up if you’re not used to Jupyter is setting the “kernel.” In the upper right of the workbook click on “Python 3 (ipykernel)” and choose “voicecraft” in the resulting dialog box.
Next, we’ll walk through the relevant settings by cell. Note that each cell in the workbook has “[X]:” on its left side which is its cell number.
Configuration
Cell 1
os.environ["USER"] = "me"Set this to your Windows username. If you’re unsure of this, in a PowerShell window run docker exec jupyter pwd to double check what it has picked up and input what comes after /home/
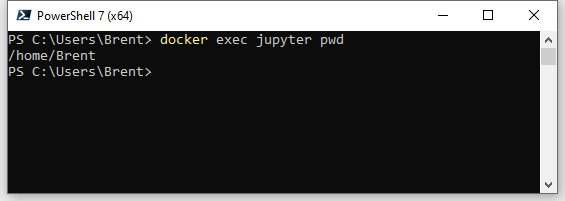
pwd showing /home/BrentCell 4
orig_audio = "./demo/5895_34622_000026_000002.wav"
orig_transcript = "Gwynplaine had, besides, for his work and for his feats of strength, round his neck and over his shoulders, an esclavine of leather."
Here is where you define your input audio. You should be using a clip of clear speech under 10 seconds long with an accurate transcription.
When you want to use your own audio file, upload it into the demo directory using the JupyterLab file browser, update the filename in orig_audio and provide a transcription.
Cell 5
cut_off_sec = 3.6
target_transcript = "Gwynplaine had, besides, for his work and for his feats of strength, I cannot believe that the same model can also do text to speech synthesis too!"
kvcache = 1
There’s many settings available to you here but I’ve highlighted the important ones to get started. This workbook out of the box is setup for you to modify the original speech and merge them together into a (hopefully) seamless audio file.
You should set cut_off_sec to a pause after the final word of the original audio that you want to use. In target_transcript include the initial text you intend to keep, and add your modifications afterwards.
For kvcache you can switch this to 0 to minimize VRAM/RAM usage. Personally I have not had performance problems when turning this off, so for overall system stability it is worth changing.
Running the workbook
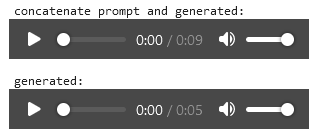
Once you’re done configuring, run the workbook cell-by-cell. Go to the top, click the [1] cell, and press Shift+Enter, or press the ▶ icon. This will advance the selection to the next cell, and you’ll repeat until you run the [5] cell where most of the processing is done. If successful, on completion you’ll have two playable audio files.